

React impacts front-end developers everyday. Recent results from the Stack Overflow Developer survey 20221 show React is still favored after all these years – 44% of survey respondents who are professional developers, make use of the framework.
One of the best aspects of the framework is that it makes UI updates efficient with a virtual Document Object Model (DOM), so that web pages load faster. Why, then, do moderately sized React web apps still lag, and perform poorly?
Even React needs optimization, from time to time.
React doesn’t magically make your app faster. But by understanding how React works, and how the components live through the component lifecycle, it represents an essential learning for professional developers.
Performance improvements come from measuring and optimizing how and when your components render. Fortunately, React provides the tools and functionalities necessary to make those measurements meaningful and manageable.
This optimization tutorial demonstrates methods to improve your React app load speed.
It covers strategies you can use to achieve a fast app speed for:
- Developers who are at the early setup stage
- Developers who are at the building stage
- Or developers who have built their app and are ready for the production stage.
|
Note: For more information on integrating the TinyMCE into the React framework , check out the React WYSIWYG editor integration page, which contains further information. |
|
HatTip: This article’s content and advice would not have been possible without the work of William Wang |
Contents
Where to start optimizing react?
What are common React performance issues?
How to optimize react app during setup
Enabling Gzip on your web server
How to optimize react apps when building
Confirm if React should update components
How to optimize react apps during production
Controlling the production build
Visual performance management tools
Where to start optimizing React?
During the initial render, React builds a virtual DOM – a structure made from your app’s components. It might look like this:
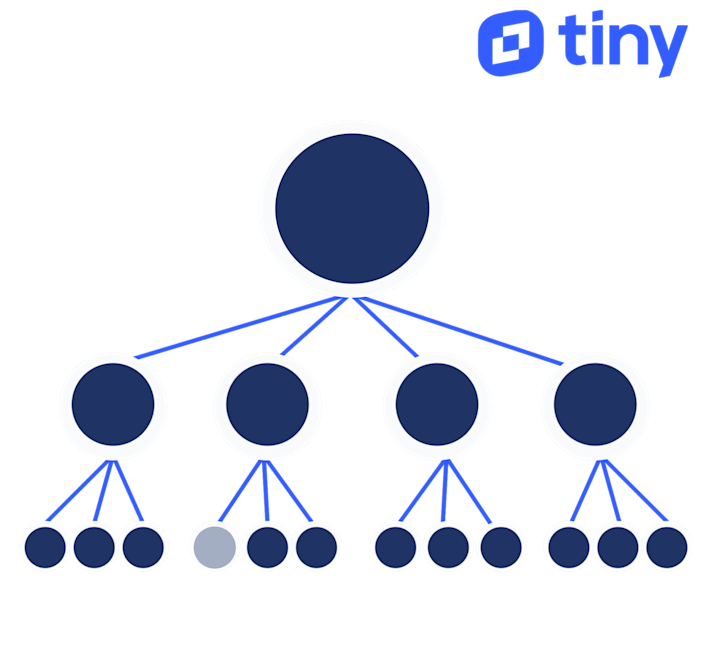
Given a part of the data changes, what we want React to do is re-render only the components that are directly affected by the change (and possibly skip even the diff process for the rest of the components). The following is an optimal loading of react components, with only the required components represented in gray:
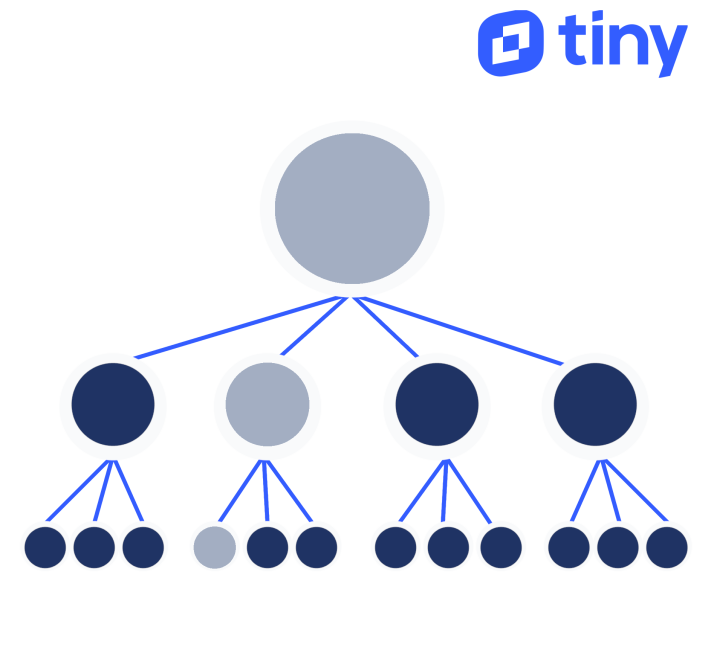
However, what React ends up doing is a sub-optimal loading of components, where React loads all components:
In the image above, all of the blue nodes are rendered and different, as well as the required gray nodes, resulting in wasted time and computation resources. This is where we'll primarily put in our optimization efforts Configuring each component to only render-diff when it is necessary, allows us to reclaim these wasted CPU cycles.
Developers of the React library took this into consideration and provided a hook for us to do just that: a function that lets us tell React when it’s okay to skip rendering a component.
What are common React performance issues?
Issues with performance might be hiding until you launch your React app on other environments. If you suspect any of the following are happening to your React app, check through the following sections for optimization strategies. These are three common performance issues:
1. Re-rendering
A component in your app is re-rendering code when modified at runtime, without modifying the original code. Re-rendering can cause performance issues across all different components.
2. Clumped component tree
When components are grouped together, the overall app performance can decline. Best practice is to place commonly updated regions into their own, isolated components.
3. Not using pure components
A pure component only re-renders if the props are different when React compares the previous prop state to the current state. More on this optimization can be found in the section on pure components in the following paragraphs.
How to optimize React app during setup
Getting off to a good start can make all the difference when building a React app. The following optimizations are important considerations for the start of your new project.
Using Eslint-plugin-react
Use ESLint for almost any JavaScript project. React is no different. With eslint-plugin-react, you are forcing yourself to adapt to a lot of rules in React programming that can benefit your code in the long run, and avoid many common problems and issues that occur due to poorly written code.
Enabling Gzip on your web server
React 's bundle JS files are commonly very big, so to make the web page load faster, we can enable Gzip on the web server (Apache, Nginx, etc.)
Modern browsers all support and automatically negotiate Gzip compression for HTTP requests. Enabling Gzip compression can reduce the size of the transferred response by up to 90%, which can significantly reduce the amount of time to download the resource, reduce data usage for the client, and improve the time to first render of your pages.
Check the documentation for your web server on how to enable compression:
Apache:
mod_deflate;
Nginx:
ngx_http_gzip_module;
Binding functions early
It is very common to see functions bound to the context of the component inside the render function. This is often the case when we use these functions to handle events of child components.
// Creates a new `handleUpload` function during each render()
<TopBar onUpload={this.handleUpload.bind(this)} />
// ...as do inlined arrow functions
<TopBar onUpload={files => this.handleUpload(files)} />This causes the render() function to create a new function on every render. A much better way of doing the same is:
class App extends React.Component {
    constructor(props) {
        super(props);
        this.handleUpload = this.handleUpload.bind(this);
    }
    render() {
        …
        <TopBar onUpload={this.handleUpload} />
        …
    }
}How to optimize React apps when building
If you’ve started building your project, there are still steps you can take to optimize and add speed to your React app.
Using multiple chunk files
For single-page React web apps, we often end up bundling all of our front-end JavaScript code in a single minified file. This works fine for small to moderately sized web apps. But as the app starts to grow, delivering this bundled JavaScript file to the browser in itself can become a time consuming process.
If you are using Webpack to build your React app, you can leverage its code splitting capabilities to separate your built app code into multiple “chunks” and deliver them to the browser on an as-needed basis.
There are two types of splitting:
- Resource splitting
- On-demand code splitting
With resource splitting, you split resource content into multiple files. For example, using CommonsChunkPlugin, you can extract common code (such as all external libraries) into a “chunk” file of its own. Using ExtractTextWebpackPlugin, you can extract all CSS code into a separate CSS file.
This kind of splitting helps in two ways. It helps the browser to cache those less frequently changing resources. It also helps the browser to take advantage of parallel downloading to potentially reduce the load time.
A more notable feature of Webpack is on-demand code splitting. You can use it to split code into a chunk that can be loaded on-demand. This can keep the initial download small, reducing the time it takes to load the app. The browser can then download other chunks of code on-demand when needed by the application. Check on the Webpack Code Splitting docs for more information.
Making data immutable
What if you could use a React.PureComponent but still have an efficient way of telling when any complex props or states have changed automatically? This is where immutable data structures make life easier.
The idea behind using immutable data structures is simple. Whenever an object containing complex data changes, instead of making the changes in that object, create a copy of that object with the changes. This makes detecting changes in data as simple as comparing the reference of the two objects.
You can use Object.assign or _.extend (from Underscore.js or Lodash):
const newValue2 = Object.assign({}, oldValue);
const newValue2 = _.extend({}, oldValue);
Even better, you can use a library that provides immutable data structures:
var map1 = Immutable.Map({a:1, b:2, c:3});
var map2 = map1.set('b', 2);
assert(map1.equals(map2) === true);
<span style="font-family: -apple-system, BlinkMacSystemFont, 'Segoe UI', Roboto, Oxygen, Ubuntu, Cantarell, 'Open Sans', 'Helvetica Neue', sans-serif;">var map3 = map1.set('b', 50);
</span>assert(map1.equals(map3) === false);Here, Immutable.Map is provided by the library Immutable.js.
Every time a map is updated with its method set, a new map is returned only if the set operation changed the underlying value. Otherwise, the same map is returned.
For more information about immutability, check on the following:
- Toptal’s resource on immutability in JavaScript with Redux
- The TinyMCE article on immutability as a programming principal
Using a React.PureComponent
To ease and automate this optimization technique, React provides what is known as a “pure” component. A React.PureComponent is exactly like a React.Component that implements a shouldComponentUpdate() function with a shallow prop and state comparison.
A React.PureComponent is more or less equivalent to this:
class MyComponent extends React.Component {
    shouldComponentUpdate(nextProps, nextState) {
        return shallowCompare(this.props, nextProps) && shallowCompare(this.state, nextState);
    }
    …
}As it only performs a shallow comparison, you may find it useful only when:
Your props or states contain primitive data.
Your props and states have complex data, but you know when to call forceUpdate() to update your component.
Confirming if React should update components
By default, React runs and renders the virtual DOM, and compares the difference for every component in the tree for any change in its props or state. But that is obviously not reasonable.
As your app grows, attempting to re-render and compare the entire virtual DOM at every action will eventually slow down.
React provides a simple way for the developer to indicate if a component needs re-rendering. This is where the shouldComponentUpdate method comes into play.
function shouldComponentUpdate>(nextProps, nextState) {
    return true;
}When this function returns true for any component, it allows the render-diff process to be triggered.
This gives you a simple way of controlling the render-diff process. Whenever you need to prevent a component from being re-rendered at all, simply return false from the function. Inside the function, you can compare the current and next set of props and state to determine whether a re-render is necessary:
  function shouldComponentUpdate>(nextProps, nextState) {
    return nextProps.id !== this.props.id;
}How to optimize React apps during production
The production build steps also have their own set of optimizations that you can run to add further speed to your optimized React app.
Controlling the production build
When developing a React app, you are presented with really useful warnings and error messages. These make identifying bugs and issues during development a bliss. But they come at the cost of performance.
If you look into React’s source code, there’s a lot of if (process.env.NODE_ENV != 'production') checks. These chunks of code that React is running in your development environment, isn’t something needed by the end user. For production environments, all of this unnecessary code can be discarded.
If you bootstrapped your project using create-react-app, then you can simply run npm run build to produce the production build without this extra code. If you’re using Webpack directly, you can run webpack -p (which is equivalent to webpack --optimize-minimize --define process.env.NODE_ENV="'production'".
Performance measurement tools
Don’t start optimizing code that you feel may be slowing your app down. Instead, let React performance measuring tools guide you through the path to take.
React has a powerful tool, designed just for this function. Using the react-addons-perf library you can get an overview of your app’s overall performance.
The usage is:
Import Perf from 'react-addons-perf'
Perf.start();
// use the app
Perf.stop();
Perf.printWasted();This prints a table with the amount of time components wasted in rendering. The library provides other functions that let you print different aspects of the wasted time separately (e.g., using the printInclusive() or the printExclusive() functions), or even print the DOM manipulation operations (using the printOperations() function).
Visual performance management tools
If you’re a visual person, then react-perf-tool is just the thing you need.
react-perf-tool is based on the react-addons-perf library. It gives you a more visual way of debugging performance of your React app. It uses the underlying library to get measurements and then visualizes them as graphs. More often than not, this is a much more convenient way of spotting bottlenecks, and you can easily use it by adding it as a component to your application.
How to create a fast React app
To make the most of React, you need to leverage its tools and techniques. A React web app’s performance lies in the simplicity of its components. Overwhelming the render-diff algorithm can make your app perform poorly in frustrating ways.
Before you can optimize your app, you’ll need to understand how React components work and how they’re rendered in the browser. The React lifecycle methods give you ways to prevent your component from re-rendering unnecessarily. By eliminating those bottlenecks you’ll have the app performance your users deserve.
Although there are more ways of optimizing a React web app, fine tuning the components to update only when required yields the best performance improvement.
Did you know that React is one of the most popular integrations for TinyMCE? If you have a React project in the works and want to take the content creation experience to the next level, click here to get started on setting up your TinyMCE-React component in the docs. For a more guided, step-by-step walkthrough on how to integrate React with TinyMCE, check out the following resources:
- The tutorial post on TinyMCE Angular integration
- The pressure test on rich text editors: comparing popular rich text editors Angular integrations.
- How to enrich an Angular textarea with TinyMCE
1 https://survey.stackoverflow.co/2022/#most-popular-technologies-webframe-prof


